
Why Is It Important To Follow An Embroidery Size Chart?
Embroidery is an art that brings fabric to life with colorful threads and intricate designs. When stitching a name on a T-shirt, making a pillow, or personalizing a towel, your embroidery design’s size matters. This is where an embroidery size chart becomes essential. It helps you decide the right size for your designs and ensures your project looks perfect when finished. You’ll learn the importance of using an embroidery size chart. It helps make your projects look professional and balanced.
What Is An Embroidery Size Chart?
An embroidery size chart is a guide that helps you choose the right size for your design based on the type of item you are working on. It lists different sizes of designs and shows what size works best for different types of clothing, fabrics, or accessories. For example, a size chart might tell you that a 3-inch design is perfect for a baby bib, while a 10-inch design is better for a large tote bag.
Using an embroidery size chart is like following a recipe when cooking. If you use the right ingredients and measurements, your dish turns out great. If you use the wrong measurements, the dish might not taste as good. Similarly, choosing the wrong embroidery size can make your project look off or poorly planned.
Why Do Embroidery Sizes Matter?
Imagine you are stitching a small heart design on a shirt pocket. If the design is too big, it may not fit on the pocket. If it’s too small, it might look lost. Here are a few reasons why embroidery sizes matter:
- Appearance: The right size makes your design stand out beautifully. If a design is too big or too small, it can ruin the overall look.
- Placement: Embroidery needs to fit well on the item. A size chart helps ensure your design fits perfectly on sleeves, pockets, or the back of a jacket.
- Readability: If you’re stitching words, a design that is too small may be hard to read. A size chart will suggest the right size for readable text.
How Does An Embroidery Size Chart Help?
Following an embroidery size chart takes the guesswork out of choosing the right design size. Here’s how it can help:
1. Ensures Perfect Fit
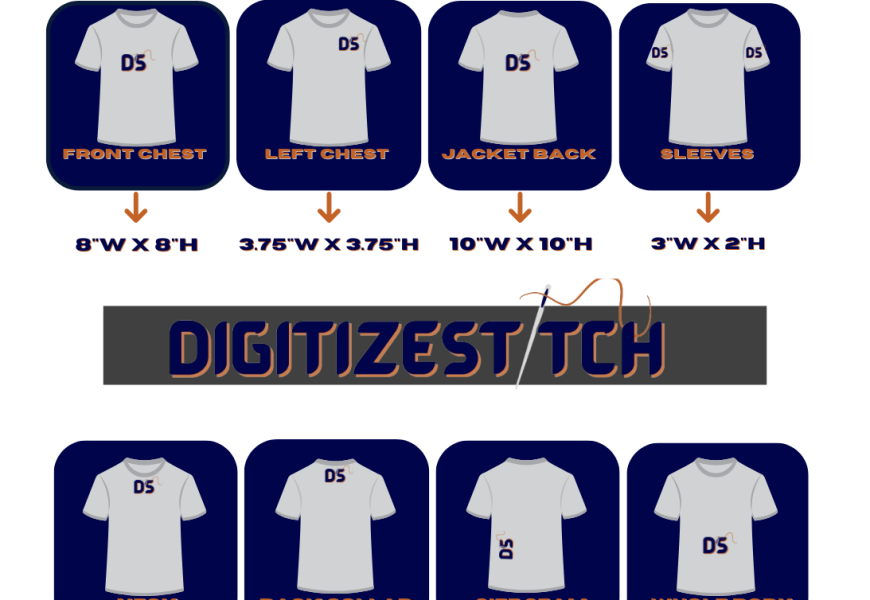
Each item you embroider has different areas where a design can fit. A size chart will tell you what size works best. For example:
- Caps and Hats: A small design (around 2-3 inches) fits best.
- Tote Bags: Larger designs (8-10 inches) look more balanced.
- Shirts: A left chest logo is usually 3-4 inches wide.
Use an embroidery design size guide. It will ensure your designs fit your items. This gives them a clean, professional look.
2. Improves Design Balance
When your design fits well, the overall project looks balanced. Imagine placing a tiny design in the middle of a large tote bag. It might look out of place. A size chart helps avoid this by guiding you to the right size for your design.
3. Saves Time And Materials
Mistakes in sizing can be costly. If you don’t follow a size chart, you might have to redo your project, wasting thread, fabric, and time. By following a chart, you get the size right the first time, reducing waste and frustration.
4. Enhances Readability And Clarity
When stitching text, the size of the letters matters a lot. A size chart will suggest a minimum size for letters to ensure they are clear and readable. This is especially important for monograms, company names, or slogans.

Examples Of Embroidery Sizes For Common Projects
Here are some typical sizes recommended by an embroidery design size guide for different projects:
- Caps and Hats: 2-3 inches
- Shirt Pockets: 2-3 inches
- Left Chest Logos: 3-4 inches
- Tote Bags: 8-10 inches
- Back of Jackets: 10-12 inches
These sizes can vary slightly based on the style of the item and the complexity of the design.
Tips For Using An Embroidery Size Chart
- Measure Twice, Embroider Once: Always measure your item carefully before starting. Double-check the size chart to ensure the design will fit.
- Test Your Design: Use scrap fabric to test your design size before stitching it onto the final item. This helps you see how it will look.
- Consider Fabric Type: Some fabrics stretch, and some don’t. Make sure your design size works well with the fabric type.
Why You Shouldn’t Guess Design Sizes
Guessing the size of your embroidery design can lead to problems:
- Poor Fit: The design may not fit properly on the item, making it look awkward.
- Wasted Materials: Incorrect sizing can ruin fabric or waste thread.
- Unprofessional Look: If the design isn’t the right size, your finished product may not look as polished.
Stitch Smart With The Right Size!
Following an embroidery size chart is like having a map for your project. It helps you pick the perfect size, making your designs look just right. By using an embroidery design size guide, you can avoid mistakes and make beautiful, neat designs every time. So, remember to check your size chart before you start stitching. It’s a smart and simple way to make sure your embroidery turns out amazing!